If you have ever dreamed of teleporting to distant lands, here is the best option. The iMovie green screen effect will help you fulfil this dream. In this article, we will give you the whole answer to how to Use Green Screen in iMovie.
First of All, What's a Green Screen?
What exactly is a green screen? It's a green background that you use during filming. Later, you can replace the green background with any image or video you want in the editing process, making it look like your actors are anywhere in the world – or beyond!
Steps of How to Use Green Screen in iMovie
Step 1: Film Your Scene
Before you can use a green screen, you need to film your scene against it. To get the best results, make sure your green screen is wrinkle-free and evenly lit. Then, position your actors or objects in front of the green screen and start filming. Remember to keep shadows or reflections away from the green screen to avoid complications during editing.
Step 2: Import Footage into iMovie
Once you've filmed your scene, it's time to bring it into iMovie. Open iMovie and start a new project. Then, import the footage you filmed against the green screen by clicking on the "Import Media" button and selecting your files.
Step 3: Add Green Screen Footage to the Timeline
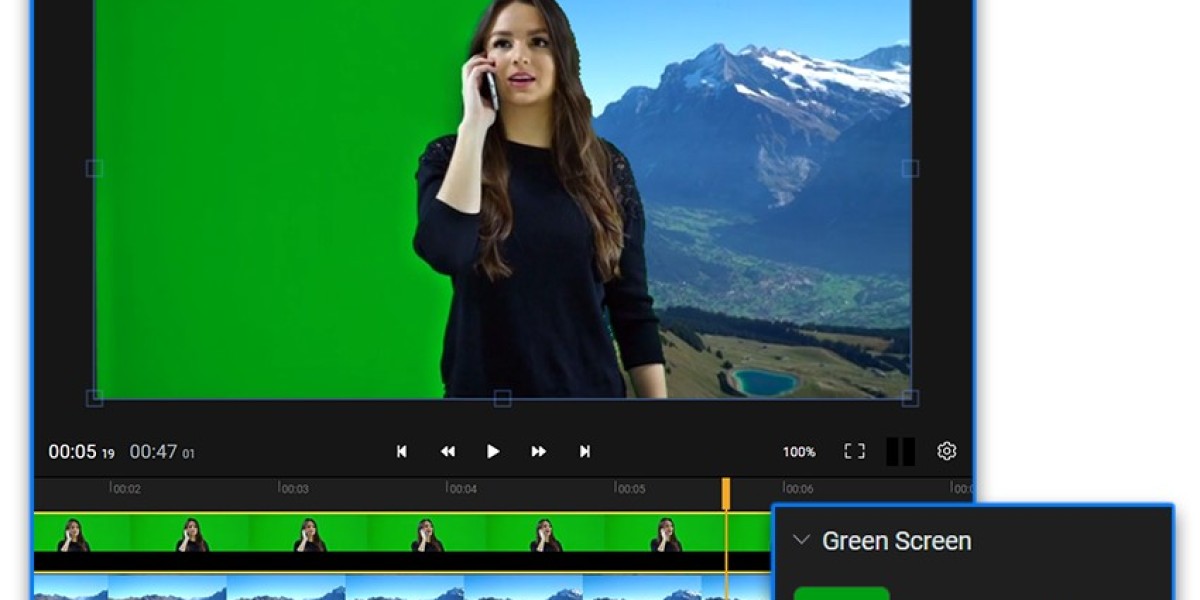
Drag and drop your green screen footage onto the timeline in iMovie. You'll see it appear in the viewer window. Play through the footage to make sure everything looks good before moving on.
Step 4: Choose Your Background
Now comes the fun part – choosing your background! Find an image or video clip that you want to replace the green screen with. This could be anything from a tropical beach to outer space – let your imagination run wild!
Step 5: Apply the Green Screen Effect
With your background chosen, it's time to apply the green screen effect. Click on the green screen clip in the timeline to select it, then click on the "Video Overlay Settings" button (it looks like a magic wand) above the viewer window. From the dropdown menu, select "Green/Blue Screen." iMovie will automatically remove the green background and replace it with your chosen background.
Step 6: Fine-Tune Your Edit
Once the green screen effect is applied, you may need to fine-tune your edit to make it look just right. Use the "Clip Adjustments" panel to adjust the green screen settings, such as the strength of the effect and the edges of your subjects. You can also add additional effects, transitions, and text to enhance your video further.
Step 7: Preview and Export
Before you finalize your project, be sure to preview it to make sure everything looks perfect. Once you're happy with the result, it's time to export your video. Click on the "File" menu, then select "Share" and choose your preferred export options. Congratulations – you've successfully used a green screen in iMovie!
Conclusion
Using a green screen in iMovie opens up a world of creative possibilities for your videos. Whether you're filming a sci-fi epic or a tropical adventure, green screens allow you to transport your audience anywhere you can imagine. With practice and experimentation, you'll soon be creating professional-looking videos that wow your viewers. So, grab your green screen and get filming – the sky's the limit!